
Shopify Guide for Beginners
What is Shopify
Shopify is one of the most commonly used eCommerce platforms that enable anyone to create and launch an online store. However, it might be difficult for newbies without a clear Shopify tutorial. So, here is the guide for Shopify.

Setting up an online store in Shopify can seem difficult in the first time, but our clear step-by-step guide will help you to do the process smoothly. Below, we provide a very detailed step-by-step guide for Shopify beginners.
How much does it cost to build a Shopify store?
Shopify offers a range of pricing plans to suit different business needs and budgets. Overall, there are 3 plans ranging from $39/month to $399/month, including:
- Shopify Basic plan;
- Shopify;
- Advanced Shopify.
New sellers can take advantage of Shopify’s 3-day free trial to test any plan. After that, they can access the $1/month promotion in 3 months. Besides, store owners can save 25% more after 3 months with the annual package from Shopify.
However, in addition to the monthly subscription fees, there are extra selling fees to consider, such as transaction fees and fees for using third-party apps.
1. Sign up for Shopify
Visit Shopify’s website:
- Visit the Shopify website.
Start your free trial:
- Click “Start a free trial”.
- Enter your email address, password, and store name. Click “Create your store”.
Account settings:
- You will be asked some questions about your business. For example, are you already selling or are you starting? Answer these questions to help Shopify provide the best experience for you.
2. Configure basic settings in Shopify

Dashboard overview:
- After logging in, the Shopify dashboard will be displayed. This is the center of store management.
General settings:
- Go to Settings > General. Configure the following settings:
- Store Name: Change as required.
- Store Address: This is important for shipping and tax calculations.
- Standards and Time Zones: Make sure the time zones and units are correct.
Currency settings:
- Go to Settings > General > Store Currency and select the currency for your store.
3. Set the look of your Shopify Store
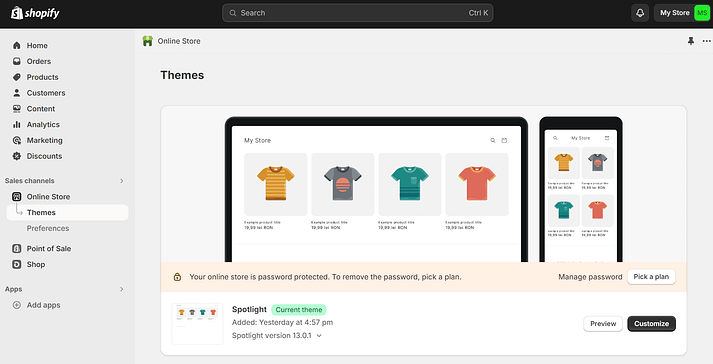
Choose a theme:
- On your dashboard, go to online Store > Themes.
- The Shopify theme store or free themes on your dashboard should be considered. Preview the themes and select one that suits the look of your shop.
- Click the Add button or Install for the theme you decide on.
CUSTOMIZE THEME:
- For your active theme, Go to Online Store > Themes and click Customize.
- Use the following settings in the theme editor.
- Header & footer: Upload logo and adjust menu.
- Homepage layout: Slide show, featured products and testimonials sections.
- Fonts & colors: This is where you can change fonts, colors & styles to match with your brand.
- Always remember to save changes often enough.
4. Additional Products
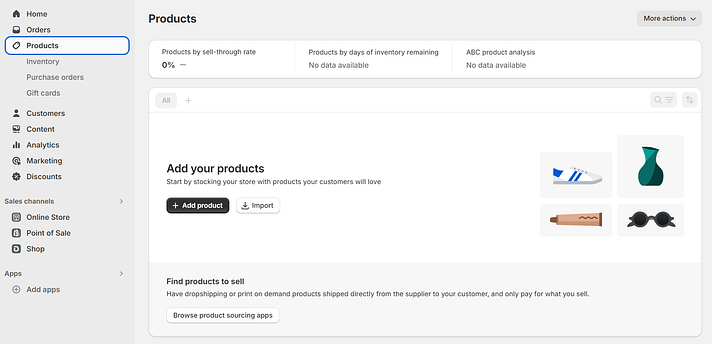
Add a New Product:
- To add a new product, go to Products > Add product.
Key in product details:
- Title: The name of the product.
- Description: Write a detailed description of the item.
- Images: Upload high quality pictures of your goods.
- Pricing: Fix your price. Inventory: Manage SKUs, barcodes and inventory quantities.
- Shipping: Enter the weight of the item and shipping information.
- Variants: Include alternatives like size or color.
Save the Product:
- Click Save to add this item into your store.
Whole salers are also available where you can list out products from Alibaba, Cj Dropshipping.
5. Configure payment processing

Payment settings:
- For payment settings, visit Settings > Payments.
Choose Payment Provider:
- Shopify Payments – Allows you to accept credit cards directly.
- Third-party Payment Providers – For example PayPal or Stripe services etc.
- Manual Payment Methods – These include cash on delivery or bank transfer options.
Complete setup:
- Follow each provider’s instructions for setup.
6. Shipping settings

Configure delivery settings:
- Navigate to Settings > Shipping and delivery.
Establish shipping zones and rates:
- Profiles for Shipping: Products, locations and others could be created.
- Zones of Shipment: Identify the markets to ship into;
- Rates of Shipment: Preferences may be set for fixed fees, weight-based charges or calculated rates.
Enabling local delivery or pickup (if applicable):
- These options should be set in the same menu if you provide local delivery or order pick-up services.
7. Set up tax settings:
- Go to Settings > Taxes and duties.
- Adjust the tax rate depending on your location and where you sell.
- Although Shopify can automatically handle taxes for many regions, you may need to adjust settings for your specific location.
8. Do not exceed needed pages
Add the relevant pages:
- Proceed to Online Store > Pages > Add page.
Do it exactly like this, when you create a homepage:
- About Us: Detail your story and objectives.
- Contact Us: Include contact information and form of contact.
- Privacy Policy: Describes how we manage your data.
- Return Policy: Indicate your refund and return policy.
Set Navigation:
- Visit Online Store > Navigation.
- Insert links for significant pages into top or footer menus.
9. Establish your domain
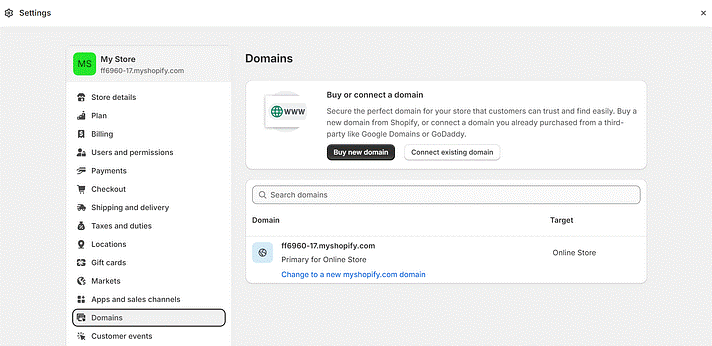
Purchase a domain:
- Go to Online Store > Domains.
- Choose Buy New Domain to buy a domain from Shopify or use one that you already own.
Connect your domain:
- If you would like to use an existing domain, follow the directions provided by Shopify about connecting domains to stores.
10. Launch your store
Go over our shopify here:
- Ensure all settings, products and pages are okay with these options all set accordingly.
Remove password protection:
- Access via Online Store > Preferences.
- To share the storefront publically, uncheck the box in the section called Password Protection’.
Test checkout process :
- To test if checkout is working well, place a test order.
- Publish your store through email, social media or other marketing.
11. Shopify Guide For Beginners Management
Monitor Store Performance:
- Use Shopify’s analytics tools to track sales, traffic, and customer reviews.
Update Your Store Regularly:
- Add new products, update it, and adjust marketing strategies.
Engage with Customers:
- Respond to customer inquiries and feedback.
12. Explore Apps and Integrations
Improve Functionality:
- Go to the Shopify App Store to find apps that add features like email marketing, SEO tools, inventory management, and more.
Install Apps:
- Choose and install apps that meet your business needs.
Conclusion of Shopify Guide For Beginners
We are sure our Shopify Guide For Beginners will help you. If you have any issues post a comment below.
How To Start Dropshipping Business
How To Start Dropshipping Business Step By Step
First, you need to know what dropshipping is and how it works. Then ‘How To Start Dropshipping Business. So,let us find out.
2 thoughts on “Shopify Step-by-Step Guide for Beginners”